The Basic Tapping Procedure - The Centerpiece of EFT
| A recipe, of course, has certain ingredients which must be added in a certain order. If you are baking a cake, for example, you must use sugar instead of pepper and you must add the sugar before you put it in the oven. Otherwise....no cake. The EFT Basic Recipe is no exception. Each ingredient must be introduced precisely as described and they must be added in the proper order. |
Although I am going to some length to describe it in detail,
The EFT Tapping Basic Recipe has only 5 brief steps (ingredients) and
takes very little effort to learn.
Once memorized,
each round of it can be performed in about 30 seconds.
It will take some practice, of course,
but after a few tries the whole process becomes familiar and
you can do it in your sleep
(millions have done this, including children).
You will then have a permanent tool that you can use for a lifetime.
Remember our Discovery Statement?
"The cause of all negative emotions is a disruption in the body’s energy system.”
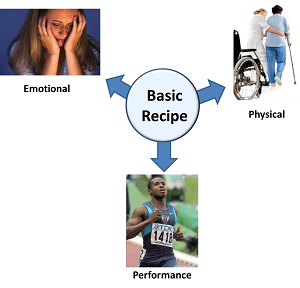
| It follows, then, that energy disruptions are the reason we have any kind of emotional issue like grief, anger, guilt, depression, trauma, and fear. Since both physical and performance issues often have emotional roots, it also follows that clearing energy disruptions can be useful for those as well. Once we find those energy disruptions, we use the tapping process to correct them. |
The EFT Tapping Basic Recipe blends focused wording with a 9 point Tapping sequence.
The focused wording tunes us in to the issue and
this, in turn, points us to the energy disruptions (zzzzzts) that we need to address.
This wording is an essential part of the process
because it tells our system what we are working on.
Negative emotions come about
because we are tuned into certain thoughts or circumstances
which, in turn, cause our energy systems to disrupt.
Otherwise, we function normally.
One's fear of heights is not present, for example,
while one is reading the comic section of the Sunday newspaper
(and therefore not tuned in to the problem).
Once tuned into the issue,
the Tapping stimulates the energy pathways
thereby balancing the resulting energy disruptions (zzzzzts).
Also, for clarification, the points we use are
at or near the end points of the energy pathways (meridians and vessels)
… OR … at points along these pathways
that are close to the body’s surface.
You may be aware that acupuncturists study
and use over 300 meridian points on the body
instead of the mere handful that are used by the EFT Tapping process.
Further, unlike EFT,
acupuncturists associate each of the energy pathways
with body organs (kidney, stomach, spleen, etc.)
and emotions (anger, fear, sadness, etc.).
We are not denying the validity of this approach
but we are ignoring it.
EFT Tapping represents a different use of these pathways
that allows someone with no formal training in Chinese medicine
to realign disruptions on their own with a simple process.
You may learn the intricacies of the Chinese meridian system if you wish,
but this knowledge is not necessary
to generate first class results with EFT.
In practice,
the 12 meridians and 2 governing vessels are interconnected
and thus sending balancing energy down one pathway influences other pathways.
That is why we usually need to address only a few pathways to get the job done.
Before I demonstrate The EFT Tapping Basic Recipe on a video,
let's
(1) take a look at the Tapping Points,
(2) set the stage with some useful Tapping Tips and
(3) review the 5 Steps in The EFT Tapping Basic Recipe.
The EFT Tapping Points
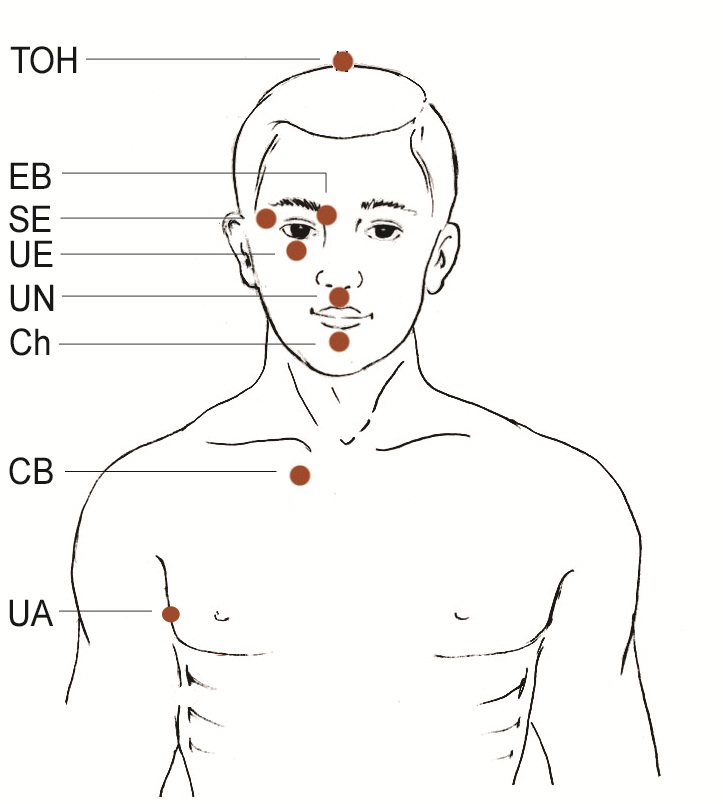
These illustrations, together with the written aids below them,
are self-explanatory and are explored in detail later (including videos).
For now,
just locate each of these points on your own body and
touch each of them with your fingertips.
Written aids to locating the EFT Basic recipe Tapping Points
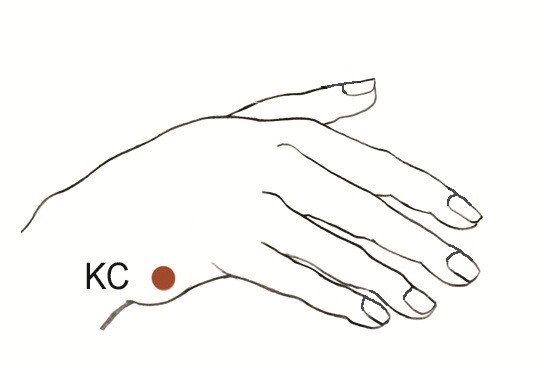
KC: The Karate Chop point (abbreviated KC) is located
at the center of the fleshy part of the outside of your hand
(either hand) between the top of the wrist and
the base of the baby finger or....stated differently....
the part of your hand you would use to deliver a karate chop.
TOH: on the top of the head.
If you were to draw a line from one ear, over the head, to the other ear,
and another line from your nose to the back of your neck,
the TOH point is where those two lines would intersect.
EB: At the beginning of the eyebrow, just above and to one side of the nose.
This point is abbreviated EB for beginning of the EyeBrow.
SE: on the bone bordering the outside corner of the eye.
This point is abbreviated SE for Side of the Eye.
UE: on the bone under an eye about 1 inch below your pupil.
This point is abbreviated UE for Under the Eye.
UN: on the small area between the bottom of your nose and the top of your upper lip. This point is abbreviated UN for Under the Nose.
Ch: Midway between the point of your chin and the bottom of your lower lip. Even though it is not directly on the point of the chin, we call it the chin point because it is descriptive enough for people to understand easily. This point is abbreviated Ch for Chin.
CB: The junction where the sternum (breastbone), collarbone and the first rib meet. To locate it, first place your forefinger on the U-shaped notch at the top of the breastbone (about where a man would knot his tie). From the bottom of the U, move your forefinger down toward the navel 1 inch and then go to the left (or right) 1 inch. This point is abbreviated CB for CollarBone even though it is not on the collarbone (or clavicle) per se. It is at the beginning of the collarbone and we call it the collarbone point because that is a lot easier to say than "the junction where the sternum (breastbone), collarbone and the first rib meet."
UA: on the side of the body, at a point even with the nipple (for men) or in the middle of the bra strap (for women). It is about 4 inches below the armpit. This point is abbreviated UA for Under the Arm.
These tips answer the most common questions.
- Some of the Tapping points have twin points on each side of the body.
For example, the "eyebrow" point on the right side of the body has
a twin point on the left side of the body.
Years of experience have taught us
that you only need to tap one of these twin points.
However,
if you have both hands free
you can certainly tap on both sides for good measure. - You can also switch sides when you tap these points.
For example, during the same round of The EFT Tapping Basic Recipe,
you can tap the "karate chop" point on your left hand
and the eyebrow point on the right side of your body.
This makes the Tapping process more convenient to perform. - The Tapping is done with two or more fingertips.
This is so you can cover a larger area
and thereby insure that your Tapping covers the correct point. - While you can tap with the fingertips of either hand,
most people use their dominant hand.
For example, right handed people tap with the fingertips of their right hand
while left handed people tap with the fingertips of their left hand. - You tap approximately 5 times on each point.
No need to count the taps
because anywhere between 3 and 7 taps on each point is adequate.
The only exception is during the Setup step (explained later)
where the Karate Chop Point is tapped continuously
while you repeat some standard wording. - The process is easily memorized.
After you have tapped the Karate Chop Point,
the rest of the points go down the body
(see the Sequence Points in the diagram above).
The Eyebrow point, for example, is below the Top of the Head point.
The Side of the Eye point is below the Eyebrow point.
And so on down the body.
The 5 Steps of The EFT Tapping Basic Recipe
These simple steps are also given in the video below.
For now, just familiarize yourself with the concepts.
The video will walk you through this Tapping process
so you can memorize it easily.
1. Identify the Issue:
All you do here is make a mental note of what ails you.
This becomes the target at which you "aim" the EFT Tapping Basic Recipe.
Examples might be: Sore shoulder,
my father embarrassing me at my age 8 birthday party
or hitting that high singing note.
Be sure you are only targeting one issue at a time.
As you will learn later,
trying to combine issues in the process will compromise your results.
2. Test the Initial Intensity:
Here you establish a before level of the issue's intensity by assigning a number to it on a 0-10 scale where 10 is the worst the issue has ever been and 0 is no problem whatsoever. This serves as a benchmark so we can compare our progress after each round of The EFT Tapping Basic Recipe. If, for example, we start at an 8 and eventually reach a 4, then we know we have achieved a 50% improvement. The number of possible issues we can address with The EFT Tapping Basic Recipe is endless and they don't all fit into neat testing boxes. That is why we have an entire segment later on dedicated to Testing Your EFT Tapping Work. For this stage of your learning, however, here are some useful methods to help you access your issue(s) and arrive at your 0-10 numbers. They apply to most issues.
- For emotional issues, you can recreate the memories in your mind and assess their discomforts.
- For physical ailments you can simply assess the existing pain or discomfort.
- For performance issues you can attempt the desired performance level and measure how close you come to it.
3. The Setup:
The Setup is a process we use to start each round of Tapping. By designing a simple phrase and saying it while continuously Tapping the KC point, you let your system know what you’re trying to address.
When designing this phrase there are two goals to achieve:
1) acknowledge the problem
2) accept yourself in spite of it
We do this by saying:
“Even though I have this _______________, I deeply and completely accept myself”.
The blank above represents the problem you want to address, so you can just insert things like:
This sore shoulder:
“Even though I have this sore shoulder, I deeply and completely accept myself.”
This fear of spiders:
“Even though I have this fear of spiders, I deeply and completely accept myself.”
This humiliation at my eighth grade graduation:
“Even though I have this humiliation at my eighth grade graduation, I deeply and completely accept myself.”
This difficulty making free throws:
“Even though I have this difficulty making free throws, I deeply and completely accept myself.”
Not all of the issues will fit neatly into “Even though I have this ____________,” so you can use some flexibility when designing your Setup phrase. For example, instead of “this sore shoulder” you could say “Even though my shoulder hurts, I deeply and completely accept myself”. Or instead of “this humiliation at my eighth grade graduation” you could say “Even though my dad humiliated me at my eighth grade graduation.”
By using “Even though I have this _______________,” you will automatically choose something that represents your experience, your reaction, or a problem that you recognize as something that belongs to you, and that is an important feature.
We do not want to use EFT on someone else’s problem. For example, rather than, “Even though my son is addicted to drugs, I deeply and completely accept myself,” it’s better to focus on your own reaction which might be, “Even though I’m frustrated by my son's drug addiction.” Or instead of “Even though my husband works too much…,” better to try something like, “Even though I feel alone when my husband stays late at the office…” We want to aim EFT at our part of the problem rather than trying to fix someone else’s problem.
By identifying the problem with this phrase, you “set up” the initial zzzzzt behind the scenes so the Tapping has something to resolve.
Important, Important, Important:
The language that we use always aims at the negative. This is essential because it is the negative that creates the energy disruptions (zzzzzts) that The EFT Tapping Basic Recipe clears (and thus brings peace to the system). By contrast, conventional methods and popular self-help books stress positive thinking and preach avoiding the negative. This sounds good but, for our purposes, it does little more than cover over the negative with pleasant sounding words. EFT, on the other hand, needs to aim at the negative so it can be neutralized. This allows our natural positives to bubble up to the top.
4. The Sequence:
This is the workhorse part of The EFT Tapping Basic Recipe that stimulates/balances the body's energy pathways. To perform it, you tap each of the points shown in the Sequence Points diagram (see above) while saying a Reminder Phrase that keeps your system tuned into the issue. I list the points below followed by a description of the Reminder Phrase:
Top of the Head (TOH)
Beginning of the Eyebrow (EB)
Side of the Eye (SE)
Under the Eye (UE)
Under the Nose (UN)
Chin Point (CH)
Beginning of the Collarbone (CB)
Under the Arm (UA)
The Reminder Phrase is quite simple as you need only identify the issue with some brief wording. Depending on your issue, you might say the following at each tapping point....
"This sore shoulder",
"My father embarrassed me",
"This difficulty in singing that high note."
5. Test the Intensity Again:
Finally, you establish an "after" level of the issue's intensity by assigning a number to it on a 0-10 scale. You compare this with the before level to see how much progress you have made. If you are not down to zero then repeat the process until you either achieve zero or plateau at some level. You can also include some additional Tapping points that will be introduced in the next section of this article. Otherwise, you will likely need to "get to the roots of the issue" (see Intro to Part II of The Gold Standard EFT Tutorial).
Now follow along with this video as I demonstrate The EFT Tapping Basic Recipe live. It assumes you have familiarized yourself with the Tapping Points, Tapping Tips and the 5 Steps to the EFT Tapping Basic Recipe given above. Accordingly, you may want to review them again before proceeding with the video.
THE EFT BASIC RECIPE - WATCH VIDEO
Note to EFT’ers with training prior to this Tutorial:
The EFT Tapping Basic Recipe has been streamlined in the following ways:
(1) What was formerly known as The EFT Shortcut is now The EFT Basic Recipe.
Other Tapping points and methods as well as the 9 Gamut procedure
have been recategorized and put “on the shelf” for use
when one may be stuck on an issue (to be discussed later).
(2) The term Psychological Reversal (PR) has been eliminated
because, after years of experience,
I think it was mis-named.
In practice,
PR is a form of secondary gain/loss
or a new aspect of the original problem.
While the correction for PR remains in the EFT Basic Recipe,
I have found that PR can be handled effectively
with the proper treatment of Aspects,
Specific Events, and Detective Work (see later articles).
(3) The Sore Spot, The Collarbone Breathing Technique and Floor to Ceiling Eyeroll have been eliminated because of their rare use.
(4) The idea of “subsequent round adjustments”
wherein we formerly addressed the “remaining” problem is
no longer considered essential.
You will see it, however, in the other videos simply
because it was considered useful
when they were filmed.
It's use does not add or detract from the process.
Also, to allay any scientific concerns,
this streamlining has not changed the previous protocol
from a research point of view.
The basic Tapping points and language remain the same.
The EFT Tapping Basic Recipe protocol, for convenience and ease of use, has merely been divided into smaller parts and thus one need only reassemble the individual parts to arrive at the original used in previous research. Thus all past research is still valid and remains unaffected by this Tutorial. New research can use this streamlined update.
Test Drive:
Now let’s give The EFT Tapping Basic Recipe a test drive. Just pick an issue of your own and tap along with me in the next video. With a few practice rounds you will embed the process into your memory and will then be able to apply it to a wide variety of issues. Please remember, though, that you are still a beginner at this so you may or may not experience relief this first time. That’s OK. Our goal at this point is to acquaint you with the process. Results follow as you expand your use of it. There is much more to learn if you wish to pursue this Tutorial further (recommended).
TEST DRIVING THE EFT BASIC RECIPE - WATCH VIDEO
Other Tapping Points and Routines
The standard EFT Tapping Basic Recipe points you learned above are the ones you will use over 90% of the time. In addition, there are some other points you may find useful under certain circumstances. If your initial rounds of the EFT Tapping Basic Recipe have not brought the intensity to zero, you can include any of these into your next Tapping round to see if they help. They are worth learning, even at this early stage, so I describe them next as well as in a video a few paragraphs below.
The Finger Points:
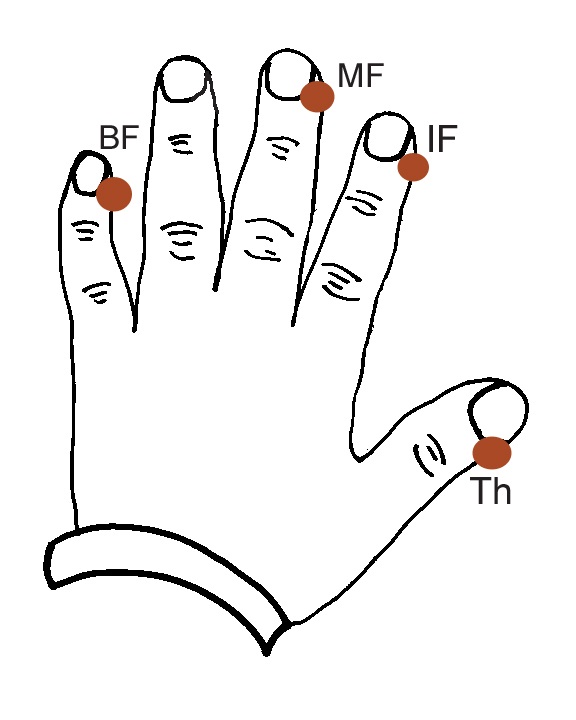
These are useful when you’d like to extend the EFT Tapping Basic Recipe and try a more thorough round on stubborn aspects. They also come in handy when any of the regular Tapping points are hard to reach or become irritating. They can be very effective on their own and I sometimes use them instead of the standard points. Also note that you tap the facial and torso points with your fingertips and, in so doing, you also stimulate the finger points.
The Tapping point is in the same location for each finger and each thumb. on the index finger (IF), tap on the side of the finger that is closest to the thumb, even with the base of the nail. once you have located that one, you can find the similar MF (middle finger), BF (baby finger), and Th (thumb) points on each hand.
Just for simplicity, the Ring Finger has not been included in this sequence. For those who may be curious, the meridian involved runs on the opposite side of that finger. I may occasionally include a point on the ring finger while I’m tapping because it’s easier than explaining why I leave it out. However, the EFT process and all of its power were built without this point and our results have not been affected by either including it or leaving it out.
The Below Nipple Point (often called the Liver Point):
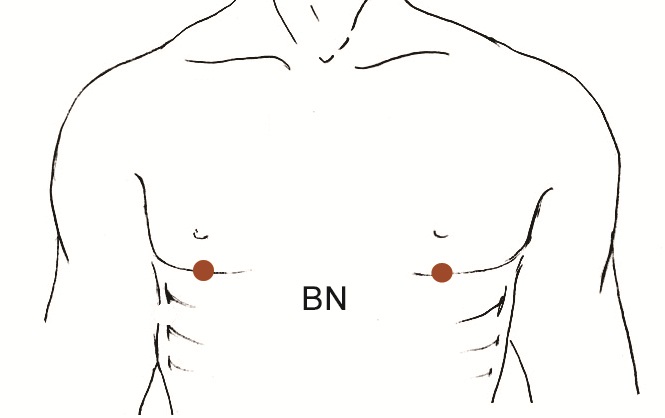
You won't see this one on our Art of Delivery videos or elsewhere in our materials. This is because it is socially awkward for women to tap. For the male, it is located one inch below the nipple. For the female it is where the underskin of the breast attaches to the chest wall. For some women the breast must be lifted so that the point can be tapped. I include it for completeness as you may find it useful under some circumstances. I use it on rare occasion. The diagram to the right shows the BN Point on both sides of the body. As mentioned earlier, you only need to tap one of them.
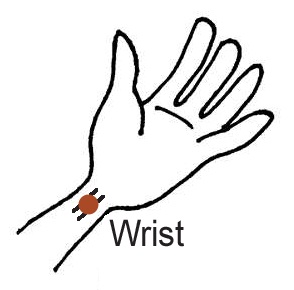
The Wrist Point:
This point is also rarely used but I acquaint you with it because you may see it in our videos. It is located on the underside of the wrist at the mid-point of where a watch band would normally reside. Please refer to the diagram for clarification.
In general, it is most effective to tap this point with several fingertips, or you can hold your hand flat and gently slap the area on the inside of the wrist. There is a twin point on each wrist and sometimes these points are "tapped" by gently banging the inside of the wrists together.
The 9 Gamut Procedure:
Originally developed by Dr. Roger Callahan, the purpose of this nine step process is to engage both sides of the brain. This is accomplished by continuously tapping a particular point on the hand while performing specific eye movements, humming and counting. It can seem like a strange process, but through connecting nerves, certain parts of the brain are stimulated when the eyes are moved. Likewise the right side of the brain (the creative side) is engaged when you hum a song and the left side (the digital side) is engaged when you count.
The 9 Gamut Procedure was a standard feature in the Basic Recipe for many years, but is now optional, and I rarely use it. I've found it helpful when there is a clear brain disorder (e.g. Cerebral Palsy) and I will include it occasionally when progress seems to be halted.
It is very difficult to explain this procedure in words and pictures. It is easier to understand when you can see a demonstration, and you will find a video link for that purpose following the written explanation.
The 9 Gamut Procedure is a 10 second process wherein a gamut of 9 "brain stimulating" actions are performed while continuously tapping on one of the body's energy points (the Gamut Point). To do the 9 Gamut Procedure, you must first locate the Gamut point.
Gamut Point:
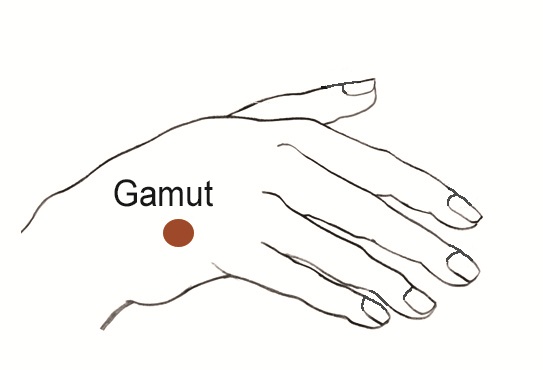
To locate the Gamut Point, which is on the back of either hand, put a finger between the ring and little finger at the base. From this location, move your finger about a half inch toward your wrist and this is where you’ll tap the Gamut Point. Please see the illustration for clarity.
9 Actions:
While facing forward and keeping your head still, tap the Gamut point continuously while performing the following nine actions:
- Eyes closed.
- Eyes open.
- Eyes hard down right while holding the head steady.
- Eyes hard down left while holding the head steady.
- Roll your eyes in a circle as though your nose was at the center of a clock and you were trying to see all the numbers in order.
- Same as the previous step, but roll your eyes the other direction.
- Hum 2 seconds of a song (any song will do, but I often use Happy Birthday).*
- Count rapidly from 1 to 5.
- Hum 2 seconds of a song again.
* For some people, humming Happy Birthday causes resistance because it brings up memories of unhappy birthdays. In this case, you can either use EFT on those unhappy memories and resolve them … or … you can side step this issue for now by humming some other song.
Now, in the interest of being thorough, here is a video where I demonstrate the Finger Points, Below the Nipple or BN Point (often called the Liver Point), Wrist Point and the 9 Gamut Procedure. The video assumes you have thoroughly familiarized yourself with the above descriptions.
OTHER EFT TAPPING POINTS & PROCEDURES - WATCH VIDEO
Review:
In this article, you learned the EFT Tapping Basic Recipe with the following components:
- 9 primary tapping points (KC, TOH, EB, SE, UE, UN, Ch, CB, UA)
- Setup Phrase on the KC point
- Reminder Phrase at the rest of the points
- Measuring intensity and the 5 step process
- Additional tapping points (Fingers, BN, Wr, 9 Gamut)
© Gary and Tina Craig
All Rights Reserved
[출처:https://www.emofree.com/eft-tutorial/tapping-basics/how-to-do-eft.html]
'[ 미정리 ] > 감정자유기법' 카테고리의 다른 글
| The EFT Personal Peace Procedure (0) | 2018.02.10 |
|---|---|
| 감정자유기법 미니 메뉴얼 (0) | 2018.02.09 |
| EFT, 간단한 자가 치료법 (0) | 2018.01.27 |
| EFT, 감정을 자유롭게 놓아주기 (0) | 2018.01.27 |
| Procedure of EFT (0) | 2018.01.17 |

