A contact form on your site allows visitors to communicate with the site owner. By using this form, you can keep your email address relatively safe from unwanted emails. Plus, you can easily connect it to your database and keep a record of users who are trying to contact you. After that, you can easily contact them via their email addresses.

Prerequisites
For the purpose of this tutorial, I assume that you have a PHP application installed on a web server. My setup is:
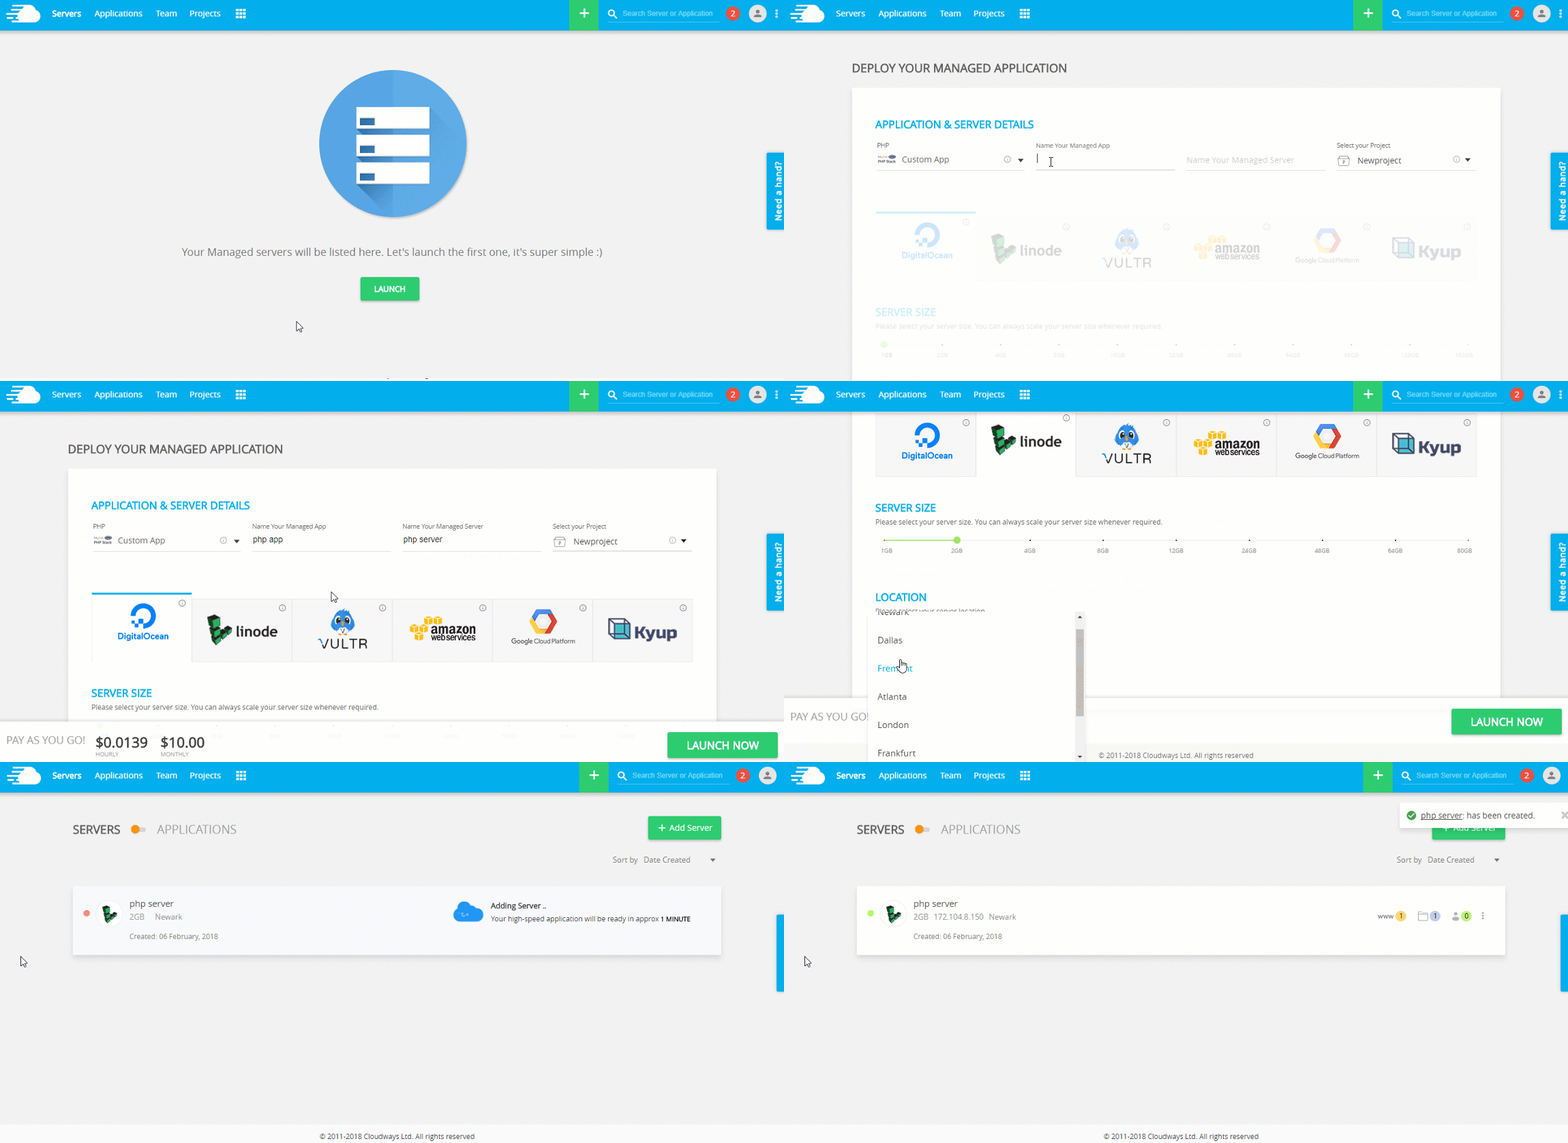
To make sure that that I don’t get side-tracked by server level issues, I decided to host my PHP application on Cloudways managed servers because the Platform offers a powerful Laravel optimized environment. In addition, I don’t have to deal with server management hassles and thus focus on the core idea of this tutorial. You can try out Cloudways for free by signing for an account and then following this simple GIF for setting up the server and the Laravel application.

Create a Contact Form
Create a contact form giving below with simple HTML5 validation and save it with .php extension. Value which will be written between the double quotes in attribute Name like name=”u_name” in input tags work as a variable name. These attributes will contain the data from the form that we will use to save in our database . There are two methods to send your form data to your PHP page: GET and POST. To learn the difference between them, click here. I will be using POST as it hides the user data and there is no limit to send data.
Note: For styling you can use your own CSS and also use Bootstrap Classes for better styling.
1 2 3 4 5 6 7 8 9 10 11 12 13 14 15 16 17 18 19 20 21 22 23 24 25 26 27 28 29 30 31 32 33 34 35 36 37 38 39 40 41 42 43 44 45 46 47 48 49 50 51 52 53 54 55 56 57 58 59 60 61 62 63 64 65 66 67 68 69 70 71 72 73 74 75 76 77 78 79 80 81 82 83 84 85 86 87 88 89 90 91 92 93 94 95 96 97 98 99 | !DOCTYPE html> <html> <head> <!-- Latest compiled and minified CSS --> <link rel="stylesheet" href="https://maxcdn.bootstrapcdn.com/bootstrap/3.3.7/css/bootstrap.min.css" integrity="sha384-BVYiiSIFeK1dGmJRAkycuHAHRg32OmUcww7on3RYdg4Va+PmSTsz/K68vbdEjh4u" crossorigin="anonymous"> <style> #loading-img{ display:none; } .response_msg{ margin-top:10px; font-size:13px; background:#E5D669; color:#ffffff; width:250px; padding:3px; display:none; } </style> </head> <body> <div class="container"> <div class="row"> <div class="col-md-8"> <h1><img src="Inquiry.png" width="80px">Easy Contact Form With Ajax MySQL</h1> <form name="contact-form" action="" method="post" id="contact-form"> <div class="form-group"> <label for="Name">Name</label> <input type="text" class="form-control" name="your_name" placeholder="Name" required> </div> <div class="form-group"> <label for="exampleInputEmail1">Email address</label> <input type="email" class="form-control" name="your_email" placeholder="Email" required> </div> <div class="form-group"> <label for="Phone">Phone</label> <input type="text" class="form-control" name="your_phone" placeholder="Phone" required> </div> <div class="form-group"> <label for="comments">Comments</label> <textarea name="comments" class="form-control" rows="3" cols="28" rows="5" placeholder="Comments"></textarea> </div> <button type="submit" class="btn btn-primary" name="submit" value="Submit" id="submit_form">Submit</button> <img src="img/loading.gif" id="loading-img"> </form> <div class="response_msg"></div> </div> </div> </div> <script src="http://ajax.googleapis.com/ajax/libs/jquery/1.11.2/jquery.min.js"></script> <script> $(document).ready(function(){ $("#contact-form").on("submit",function(e){ e.preventDefault(); if($("#contact-form [name='your_name']").val() === '') { $("#contact-form [name='your_name']").css("border","1px solid red"); } else if ($("#contact-form [name='your_email']").val() === '') { $("#contact-form [name='your_email']").css("border","1px solid red"); } else { $("#loading-img").css("display","block"); var sendData = $( this ).serialize(); $.ajax({ type: "POST", url: "get_response.php", data: sendData, success: function(data){ $("#loading-img").css("display","none"); $(".response_msg").text(data); $(".response_msg").slideDown().fadeOut(3000); $("#contact-form").find("input[type=text], input[type=email], textarea").val(""); } }); } }); $("#contact-form input").blur(function(){ var checkValue = $(this).val(); if(checkValue != '') { $(this).css("border","1px solid #eeeeee"); } }); }); </script> </body> </html> |

Configure the Database
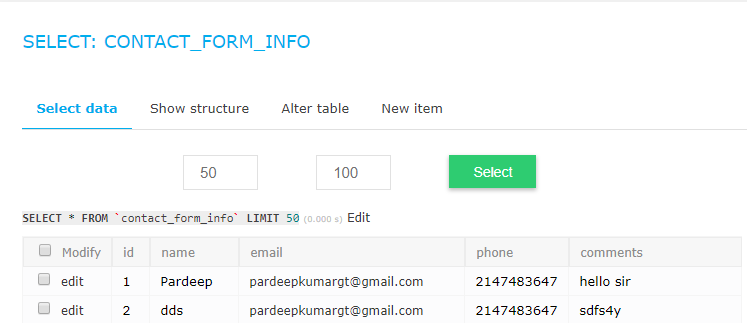
The next step is ro setup and configure the MySQL database. For this, fire up the Cloudways Database manager and create a table ‘contact_form_info’, with the fields id , name , email , phone,comments.
Next, create config.php that will be used to set up the connection between the PHP app and the database. once the file has been created, open it and paste the following code in it:
| <?php $host = "localhost"; $userName = "fyrhp"; $password = "RTDE"; $dbName = "fyrhp"; // Create database connection $conn = new mysqli($host, $userName, $password, $dbName); // Check connection if ($conn->connect_error) { die("Connection failed: " . $conn->connect_error); } ?> |
You might also like: How to Connect to a Remote MySQL Database
Create the PHP Script
Now let’s create a file get_response.php and paste the following code in it:
1 2 3 4 5 6 7 8 9 10 11 12 13 14 15 16 17 18 19 20 21 22 23 24 25 26 27 | <?php require_once("config.php"); if((isset($_POST['your_name'])&& $_POST['your_name'] !='') && (isset($_POST['your_email'])&& $_POST['your_email'] !='')) { require_once("contact_mail.php<strong>"); </strong> $yourName = $conn->real_escape_string($_POST['your_name']); $yourEmail = $conn->real_escape_string($_POST['your_email']); $yourPhone = $conn->real_escape_string($_POST['your_phone']); $comments = $conn->real_escape_string($_POST['comments']); $sql="INSERT INTO contact_form_info (name, email, phone, comments) VALUES ('".$yourName."','".$yourEmail."', '".$yourPhone."', '".$comments."')"; if(!$result = $conn->query($sql)){ die('There was an error running the query [' . $conn->error . ']'); } else { echo "Thank you! We will contact you soon"; } } else { echo "Please fill Name and Email"; } ?> |
Since, I have used the POST method for submitting the form data to the server, I will use two global methods, $_REQUEST and $_POST to retrieve and save the data in the server local variable. The difference between these two is that $_REQUEST can retrieve data from both methods i.e. GET and POST. However, $_POST can only receive data from the POST method.

Here is what the script looks in action:

Mail Method
I also create a file contact_mail.php for mail in which send your contact form data on your mail easily.
| <?php $toEmail = "pardeepkumargt@gmail.com"; $mailHeaders = "From: " . $_POST["your_name"] . "<". $_POST["your_email"] .">\r\n"; if(mail($toEmail, $_POST["comments"], $_POST["your_phone"], $mailHeaders)) { echo"<p class='success'>Contact Mail Sent.</p>"; } else { echo"<p class='Error'>Problem in Sending Mail.</p>"; } ?> |
Conclusion
In this tutorial, I demonstrated creating a Contact Form using AJAX, jQuery and MySQL. Here is a live demo of the application where you could see the form in action. If you need help, just drop a comment below and I will get back to you.


